expr:class='"loading" + data:blog.mobileClass'>

Monday outfit

Monday, 13 May 2013

Quick and simple outfit for today. I guess it was time to finally go out and breath in some fresh air after these couple of months of studying. 
Szybki i prosty outfit na dzisiaj. Zgaduje, ze w koncu nadszedl czas aby wyjsc z domu i zeczerpnac troszke swiezego powietrza po kilku miesiacach uczenia sie. 

HOOOOLLAAAAA AMIGOOOS!;-)


Fuller lips in 5 minutes!

Sunday, 24 March 2013


Things you'll need: 
1. Lip liner/konturowka
2. Dark&Light&Non-coloured lip gloss/ciemny&jasny&bezbarwny blyszczyk
3. Concealer/korektor
(4. Wipes)/(chusteczka)

FULLER LIPS IN 5 MINUTES!


1. Carefully use a lip liner and lightly draw on your lip line. 
1. Usta starannie obrysoj konturowka. 


2. Fill in your lips with lip liner, so your lips can have the same colour as the lip line.
2. Nastepne cale usta pomaluj konturowka, aby mialy taki sam kolor.

3. Apply light lip gloss inside your lips. 
3. Rozprowadz jasny blyszczyk od srodka ust.

4. Now apply darker lip gloss and do the complete opposite.
4. A ciemny blyszczyk rozprowadz do okola jasnego. 

5. Now once again, you'll have to apply lighter lip gloss inside of your lips
6. Ponownie uzyj jasnego blyszczyka, i naloz go od srodka ust. 

6. And then finally apply non coloured lip gloss all over your lips
6. Na koniec uzyj bez barwnego blyszczyka

(7. If you want to go for more natural look.... Use wipes) 
7. Jesli chcecie uzyskac bardziej naturalny wyglad, uzyjcie chusteczki. 


FINAL EFFECT! 


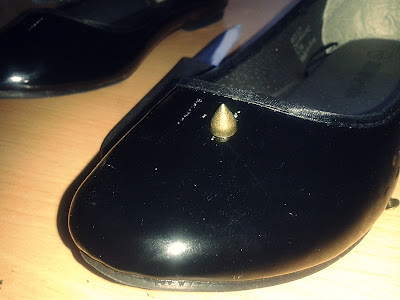
DIY spiked flat shoes

Friday, 8 February 2013

Spikes? Everyone Loves them!

And it's another post on how to make your own shoes with little effort! 

A o to i kolejny post na temat tego jak zrobic wlasne buty bez wiekszego wysilku!


1. Cut off the bows of your shoes(you can use knife as it makes it easier)

1. Odetnij kokardki od butow(mozecie uzyc do tego noza ulatwi to Wam odciecie)

2. Make a tiny hole on the shoe depending on where you want the spike to go.

2. Zrob mala dziure w miejscu, w ktorym chcesz aby znajdowal sie kolec.

3. From the inside of the shoe put the little screw in.

3. Od srodka buta wloz maja srobke. 

4. Screw in the spike onto the little screw. 

4. Wkrec kolec na srobke.

5. And then just carry on with making holes and putting in screws and spikes till you end up with something like this.
5. Kontynuuj robienie dziurek i wkladanie w nie srobek, jak i przykrecanie kolcow a powinnas uzykac taki efekt koncowy.


Hope it helped!

Mam nadzieje, ze to pomoglo!


:)

DENIM STUDDED JEAN JACKET

Thursday, 7 February 2013


And there's another piece of clothing that I've made! Yaaaaay! 

A o to kolejna czesc garderoby, ktora postanowilam przerobic! 


So let's begin!! 

[[BACK!]]-The Cross


1. Basically put the stud in the middle of the back of your jacket(you can use ruler to make it easier for yourself)

1. Cwieka przypnij na srodek tylu jeansowki(mozez uzyc linijki zeby bylo prosciej)

2. When you have your FIRST STUD IN!(Yaaaay!) 
Put one on the LEFT and the other one on the RIGHT. 

2. Kiedy juz Twoj pierwszy cwiek bedzie w jeansowce!(Huuraa!)
Wloz kolejnego po LEWEWJ stronie i po PRAWEJ.

3. Do a straight line downwards, so you can see how long the cross is going to be. 

3. Zrob linie w dol, zeby widziec jak dlugi bedzie Twoj krzyz. 

4. Carry on putting a stud on the LEFT and RIGHT side.
I got some numbers for you to see HOW MANY studs you have to put(Hope it helps!:))

4. Kontynuj przypinanie cwiekow z kazdej strony od srodkowego cwieka.
Podalam rowniez numerki zebycie widzieli ile cwiekow przypiac a kazdej strony
(Mam nadzieje, ze to pomoze!:))

5. Baaam, baam, baaam! And you should end up with something like this!

5. Baaam, baam, baaam! Tak powiennien wygladac Wasz koncowy efekt!


:)


French mixxy nails

Monday, 21 January 2013


1. Equipment needed: -2/3 nail polishes + non coloured one, scissors, sellotape and a pen.

1.Potrzebne rzeczy: 2/3 lakiery do paznokci, nozyczki, tasma i dlugopis.

2. Cut the sellotape into a kind of semi-circle shape

2. Obcinajac tasme, zrob na niej lekki lok. 

3. Put the semi-circle sellotape on the darker bits of your nails, 
so the lighter side can be available to paint.

3. Lokiem do gory naklej tasme na ciemniejsza strone paznokci,
tak zeby jasniejsza byla mozliwa do pomalowania.

4. Take two or three of your colours, and apply them on your nails.

4.Wez dwa lub trzy kolory i pomaluj nimi paznokcie.

5. Mix the two colours by using a pen.

5.Wymiejszaj te kolory za pomoca dlugopisu.

6. When you're done, slowly take the sellotape of your nails.

6.Po skonczeniu malowania paznokci, powoli sciagnij z nich tasme.

7. When you're done with taking your sellotape off,
 non coloured nail polish and apply it on your nails.

7. Kiedy skonczysz sciagac tasme,
pomaluj paznokcie bez barwnym lakierem.

AND YOU'RE DONE!