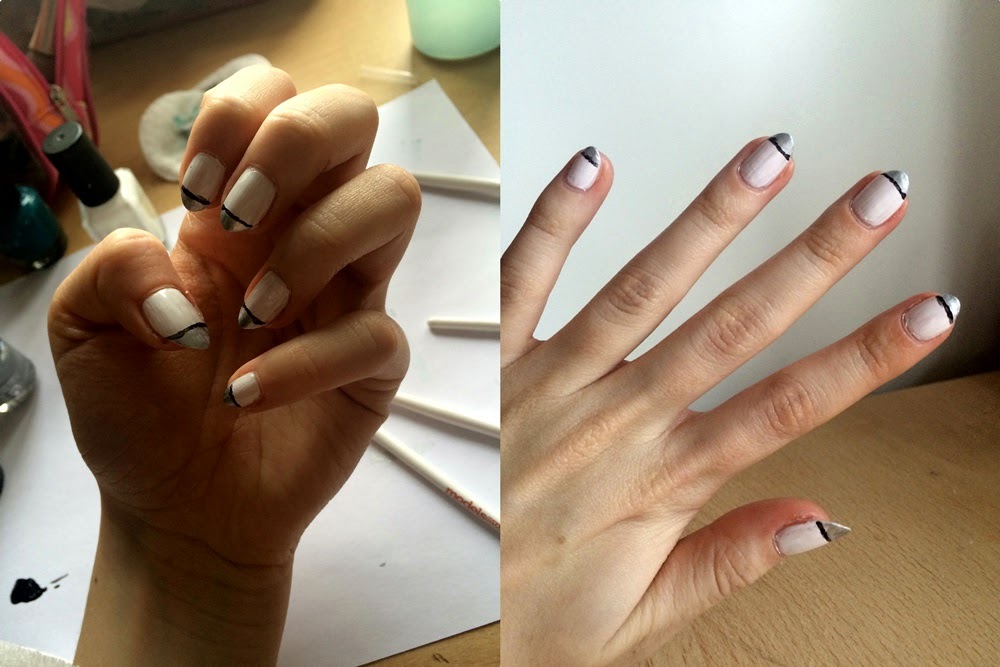
Just a quick one for today, I know the black line is far away from perfect, but I was in a bit of a rush haha. But yeah that's the post for today, just a random nail design that I came up with as I was bored, the bit that took the longest to do was to put little pieces of nail tape in a triangle shape haha, anyway I hope you like the design! Have a lovely weekend!:)
Showing posts with label Nails. Show all posts
Black, white & Silver
Thursday, 9 July 2015
Tuesday, 28 April 2015
As you have probably already noticed I like my nails to match my outfit, that's why there's 5-6 shades of one colour! Anyway I thought it would be a good idea to give you some tips on how to pick the perfect nail colour for you based on your skin tone! I hope you will find it useful and interesting so here we go!
Nail colour based on SKIN TONE:
Pale skin- yellow, orange, red
Colours for pale skin are very limited as it has pinkish undertones, therefore any colour with warm undertones such as yellow, gold, orange etc. will be perfect for you as they won't make your skin look ''too sallow''.
AVOID dark colours such as black or dark purple!
Medium skin- beige, camel, brown
You're very lucky you can pull off almost every colour! Remember nude colours suit you best!
AVOID gold!
Olive skin- gold, dark green, dark purple, black, orange
Simply, dark colours suit you best, whether it's tan or your natural skin colour look for dark colours! (However, with today's fashion, tan looks really good with WHITE and baby blue).
AVOID pastel colours.
Dark skin- purple, burgundy, red, black, cherry
Any dark shade will suit you, the darker the better!
AVOID light colours, like beige, blue or yellow, as they will make your skin look flat and dull.

Wednesday, 15 April 2015
As the weather outside is so beautiful today (23 degrees!), I decided I'll go for the summer look today and make beach waves along with nude nails which make the look more natural. I hope the sun in your area is kind and you'll get the opportunity to sunbathe and/pr spend some time outside with your friends and family. Make the most out of this gorgeous weather!!
Tuesday, 14 April 2015
First of all I hope you're all enjoying the lovely sunny weather and your Easter holidays! Since I haven't uploaded anything here for a while I'll talk about two things: nails and hair. For this season, I decided that "spring blue's" will be a great accessory to all the camel and brown trendy colours which we hear about so much for the past few weeks. So I would like to present you some nail varnish colours which I think would look great as spring and summer colours!
The top colour is 'classic turquoise' which would go with any bright colour. The bottom colour is pastel 'bubble gum' which in my opinion would go from the casual to elegant looks and still look good!
The hair product I wanted to talk about it 'Moroccan Oil' which you can purchase online for about £30. At first I was questioning whether the product would be worth the money, but after reading so many positive reviews about it and after trying it myself, I can tell you this, my hair was never so soft and shiny! I highly recommend this to all ladies, with all types of hair.
The top colour is 'classic turquoise' which would go with any bright colour. The bottom colour is pastel 'bubble gum' which in my opinion would go from the casual to elegant looks and still look good!
The hair product I wanted to talk about it 'Moroccan Oil' which you can purchase online for about £30. At first I was questioning whether the product would be worth the money, but after reading so many positive reviews about it and after trying it myself, I can tell you this, my hair was never so soft and shiny! I highly recommend this to all ladies, with all types of hair.
Thursday, 5 February 2015
Time for a different colour! Bought this amazing orange beaut last week and I must say I'm quite impressed with the colour, as with my previous experience with nail varnishes from Rimmel the brush wasn't that precise when applying the colour on my nails but this one has done a great job! Another great thing precisely about this nail polish is that after applying only one layer it looked great already, so two layers made it amazing! I would highly recommend this product to every girl who is a little obsessed with doing her nails and bright colours!
Friday, 16 January 2015
Quick tutorial on how to make simple nails with modern effect using nail brushes.
The brush set includes: long thin striping brush 1. Frist of all apply two thin layers of white
short detailing brush nail polish.
flat/wide brush
fan brush
duo dotting tools
thin roll of nail art tape
2. Once the layers have dried, using flat brush 3. Lastly, pick short detailing brush and
apply thin lines of silver nail polish creating carefully draw lines using black nail
the french manicure effect. varnish underneath silver nail polish.
Final effect
Monday, 21 January 2013
1. Equipment needed: -2/3 nail polishes + non coloured one, scissors, sellotape and a pen.
1.Potrzebne rzeczy: 2/3 lakiery do paznokci, nozyczki, tasma i dlugopis.
2. Cut the sellotape into a kind of semi-circle shape
2. Obcinajac tasme, zrob na niej lekki lok.
3. Put the semi-circle sellotape on the darker bits of your nails,
so the lighter side can be available to paint.
3. Lokiem do gory naklej tasme na ciemniejsza strone paznokci,
tak zeby jasniejsza byla mozliwa do pomalowania.
4. Take two or three of your colours, and apply them on your nails.
4.Wez dwa lub trzy kolory i pomaluj nimi paznokcie.
5. Mix the two colours by using a pen.
5.Wymiejszaj te kolory za pomoca dlugopisu.
6. When you're done, slowly take the sellotape of your nails.
6.Po skonczeniu malowania paznokci, powoli sciagnij z nich tasme.
7. When you're done with taking your sellotape off,
non coloured nail polish and apply it on your nails.
7. Kiedy skonczysz sciagac tasme,
pomaluj paznokcie bez barwnym lakierem.
AND YOU'RE DONE!
Subscribe to:
Posts (Atom)