Beach waves and nude nails
Wednesday, 15 April 2015
Tuesday, 14 April 2015
First of all I hope you're all enjoying the lovely sunny weather and your Easter holidays! Since I haven't uploaded anything here for a while I'll talk about two things: nails and hair. For this season, I decided that "spring blue's" will be a great accessory to all the camel and brown trendy colours which we hear about so much for the past few weeks. So I would like to present you some nail varnish colours which I think would look great as spring and summer colours!
The top colour is 'classic turquoise' which would go with any bright colour. The bottom colour is pastel 'bubble gum' which in my opinion would go from the casual to elegant looks and still look good!
The hair product I wanted to talk about it 'Moroccan Oil' which you can purchase online for about £30. At first I was questioning whether the product would be worth the money, but after reading so many positive reviews about it and after trying it myself, I can tell you this, my hair was never so soft and shiny! I highly recommend this to all ladies, with all types of hair.
The top colour is 'classic turquoise' which would go with any bright colour. The bottom colour is pastel 'bubble gum' which in my opinion would go from the casual to elegant looks and still look good!
The hair product I wanted to talk about it 'Moroccan Oil' which you can purchase online for about £30. At first I was questioning whether the product would be worth the money, but after reading so many positive reviews about it and after trying it myself, I can tell you this, my hair was never so soft and shiny! I highly recommend this to all ladies, with all types of hair.
Wednesday, 11 February 2015
So today another one of purchases has been delivered, it's a Fibre Lash 3D Mascara from Younique! Now let me tell you a bit about it, you get to brushes in a box which is the size of your hand, one of the brushes is a Transplanting Gel the other brush is Natural Fibres which basically adds little hairs to your lashes and makes them look more natural! I purchased this for £30 and I can tell you that it was totally worth it! You can find this product here. In the pictures below I have applied one coat of fibre so they don't look too fake, but I will present you with some pictures of other users of this mascara applying two coats so you can see the effects of it.
Here are some pictures from other users of the 3D Fibre Lash Mascara
Thursday, 5 February 2015
Time for a different colour! Bought this amazing orange beaut last week and I must say I'm quite impressed with the colour, as with my previous experience with nail varnishes from Rimmel the brush wasn't that precise when applying the colour on my nails but this one has done a great job! Another great thing precisely about this nail polish is that after applying only one layer it looked great already, so two layers made it amazing! I would highly recommend this product to every girl who is a little obsessed with doing her nails and bright colours!
Friday, 23 January 2015
Today I wanted to talk about a lash repair serum from Shu Uemura which I've been applying on my lashes for the past month, unfortunately I didn't take any before and after pictures but I did manage to find some from other ladies that were/are experimenting with the same product. The invisible lash serum mascara costs about £30, and even though I have been only using it for 4 weeks I can already tell a difference, my eyelashes are thicker and there seems to be a bit more of them.
And here are some of the before and after pictures I manages to find
Sunday, 18 January 2015
Friday's outfit before going shopping and purchasing another pair of shoes...
Which are waaay more comfortable than red stilettos aka shoes to die for.
Friday, 16 January 2015
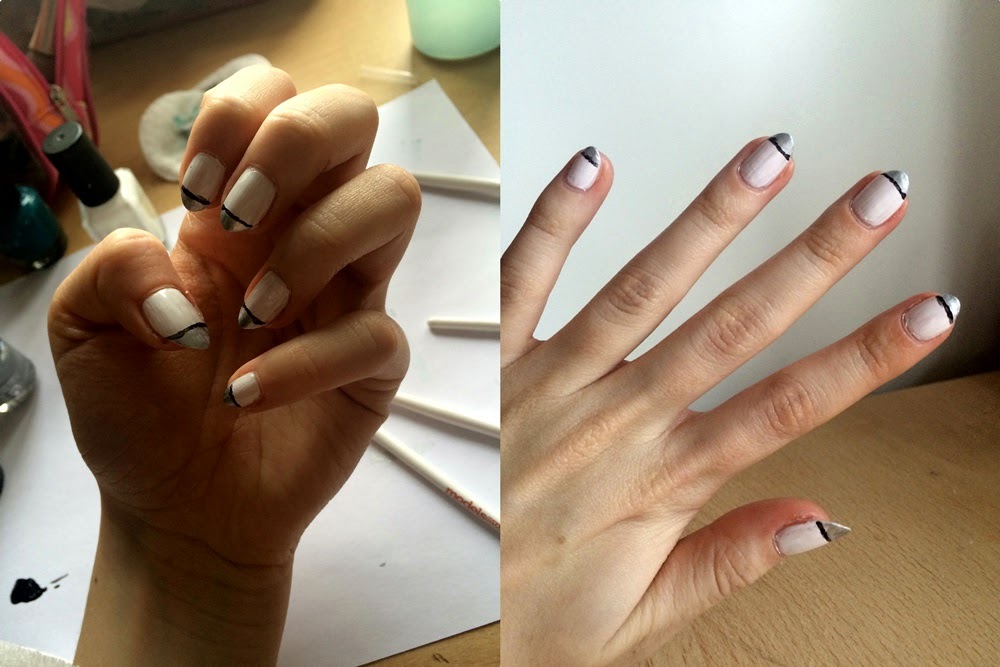
Quick tutorial on how to make simple nails with modern effect using nail brushes.
The brush set includes: long thin striping brush 1. Frist of all apply two thin layers of white
short detailing brush nail polish.
flat/wide brush
fan brush
duo dotting tools
thin roll of nail art tape
2. Once the layers have dried, using flat brush 3. Lastly, pick short detailing brush and
apply thin lines of silver nail polish creating carefully draw lines using black nail
the french manicure effect. varnish underneath silver nail polish.
Final effect
Monday, 13 May 2013
Quick and simple outfit for today. I guess it was time to finally go out and breath in some fresh air after these couple of months of studying.
Szybki i prosty outfit na dzisiaj. Zgaduje, ze w koncu nadszedl czas aby wyjsc z domu i zeczerpnac troszke swiezego powietrza po kilku miesiacach uczenia sie.
HOOOOLLAAAAA AMIGOOOS!;-)
Sunday, 24 March 2013
Things you'll need:
1. Lip liner/konturowka
2. Dark&Light&Non-coloured lip gloss/ciemny&jasny&bezbarwny blyszczyk
3. Concealer/korektor
(4. Wipes)/(chusteczka)
FULLER LIPS IN 5 MINUTES!
1. Carefully use a lip liner and lightly draw on your lip line.
1. Usta starannie obrysoj konturowka.
2. Fill in your lips with lip liner, so your lips can have the same colour as the lip line.
2. Nastepne cale usta pomaluj konturowka, aby mialy taki sam kolor.
3. Apply light lip gloss inside your lips.
3. Rozprowadz jasny blyszczyk od srodka ust.
4. Now apply darker lip gloss and do the complete opposite.
4. A ciemny blyszczyk rozprowadz do okola jasnego.
5. Now once again, you'll have to apply lighter lip gloss inside of your lips
6. Ponownie uzyj jasnego blyszczyka, i naloz go od srodka ust.
6. And then finally apply non coloured lip gloss all over your lips
6. Na koniec uzyj bez barwnego blyszczyka
(7. If you want to go for more natural look.... Use wipes)
7. Jesli chcecie uzyskac bardziej naturalny wyglad, uzyjcie chusteczki.
FINAL EFFECT!
Friday, 8 February 2013
Spikes? Everyone Loves them!
And it's another post on how to make your own shoes with little effort!
A o to i kolejny post na temat tego jak zrobic wlasne buty bez wiekszego wysilku!
1. Cut off the bows of your shoes(you can use knife as it makes it easier)
1. Odetnij kokardki od butow(mozecie uzyc do tego noza ulatwi to Wam odciecie)
2. Make a tiny hole on the shoe depending on where you want the spike to go.
2. Zrob mala dziure w miejscu, w ktorym chcesz aby znajdowal sie kolec.
3. From the inside of the shoe put the little screw in.
3. Od srodka buta wloz maja srobke.
4. Screw in the spike onto the little screw.
4. Wkrec kolec na srobke.
5. And then just carry on with making holes and putting in screws and spikes till you end up with something like this.
5. Kontynuuj robienie dziurek i wkladanie w nie srobek, jak i przykrecanie kolcow a powinnas uzykac taki efekt koncowy.
Hope it helped!
Mam nadzieje, ze to pomoglo!
:)
Subscribe to:
Posts (Atom)